
This guide helps you set up your development environment to create plugins for the Video Management System (VMS) Server.
While the VMS Server supports multiple versions of Ubuntu and Windows, this tutorial focuses on Ubuntu 24.04, the g++ compiler, and Nx Meta version 6.1.2 For more details on alternative environments, see the Supported Operating Systems article and the Ubuntu Linux OS Installation Guide.
Install prerequisite packages
To build your plugin, you need several development tools. The required compiler version depends on your VMS Server version:
Server version 4.0 requires
g++-9Server version 5.0 requires
g++-10Server version 5.1 requires
g++-12
| NOTE: The OpenCV framework is required but is automatically downloaded and configured by CMake and Conan during the build process. Do not install the default Ubuntu version of OpenCV. For more details, see the Installing and linking OpenCV framework section. |
To install the required tools, complete the following steps:
Update your package manager and install the core dependencies:
sudo apt updatesudo apt install g++-12 unzip git python3.10 python3-pip
Configure
g++-12andgcc-12as your default system compilers:sudo rm /usr/bin/g++sudo rm /usr/bin/gccsudo ln -s /usr/bin/g++-12 /usr/bin/g++sudo ln -s /usr/bin/gcc-12 /usr/bin/gcc
Download and install CMake:
wget https://github.com/Kitware/CMake/releases/download/v3.28.3/cmake-3.28.3-linux-x86_64.shchmod +x cmake-3.28.3-linux-x86_64.shsudo ./cmake-3.28.3-linux-x86_64.sh --prefix=/opt/cmake/sudo ln -s /opt/cmake/cmake-3.28.3-linux-x86_64/bin/cmake /usr/bin/cmake
Install Conan version 1.62:
sudo pip3 install conan==1.62. Reference link to Conan documentation.
Install the Nx MetaVMS
You must install the latest build of the Nx MetaVMS Media Server on your development machine.
Download the Ubuntu version of the Nx MetaVMS.
Install the downloaded package:
sudo apt install ./<path to MetaVMS .deb file>Navigate to
http://localhost:7001in your browser, then follow the instructions to create a new system and set your administrator password.
Download the Metadata SDK
Create a dedicated development directory and navigate into it:
mkdir -p ~/developcd ~/developDownload the Metadata SDK version that matches your installed VMS.
Extract the SDK archive:
unzip <path to Metadata SDK .zip file>Verify that the files extracted correctly into the
metadata_sdkfolder.
Emulate a camera
Instead of using a physical camera, you can use Testcamera, an application that emulates an IP camera using a video file.
Download and save the sample video file locally to use for object detection and tracking.
Follow the setup steps in the Testcamera: IP Camera Emulator guide to start your emulator instance before continuing.
Create and build the plugin from a template
To accelerate development, use the pre-configured sample_analytics_plugin template, which mimics a basic "Hello, World!" program by moving a text label across the screen and triggering events.
Copy the sample plugin to your development directory:
cp -a metadata_sdk/samples/sample_analytics_plugin ~/develop/opencv_object_detection_analytics_pluginNavigate to your project directory, create a build directory, and run CMake to compile the plugin:
cd ~/developmkdir buildcmake -DmetadataSdkDir=./metadata_sdk -B ./build opencv_object_detection_analytics_plugincmake --build ./build --config Release -- -j
Load and enable the plugin
To run your plugin, you must move the compiled binary to the server's plugin directory and activate it within the desktop application.
Copy the compiled
.sofile into the server plugins folder:sudo cp ~/develop/build/libsample_analytics_plugin.so /opt/metavms/mediaserver/bin/plugins/Restart the MetaVMS Server to load the new plugin:
sudo systemctl restart networkoptix-metavms-mediaserverOpen your VMS Desktop client and log in to your server.
Right-click your emulated camera and select
Camera Settings.-
Click the
Pluginstab.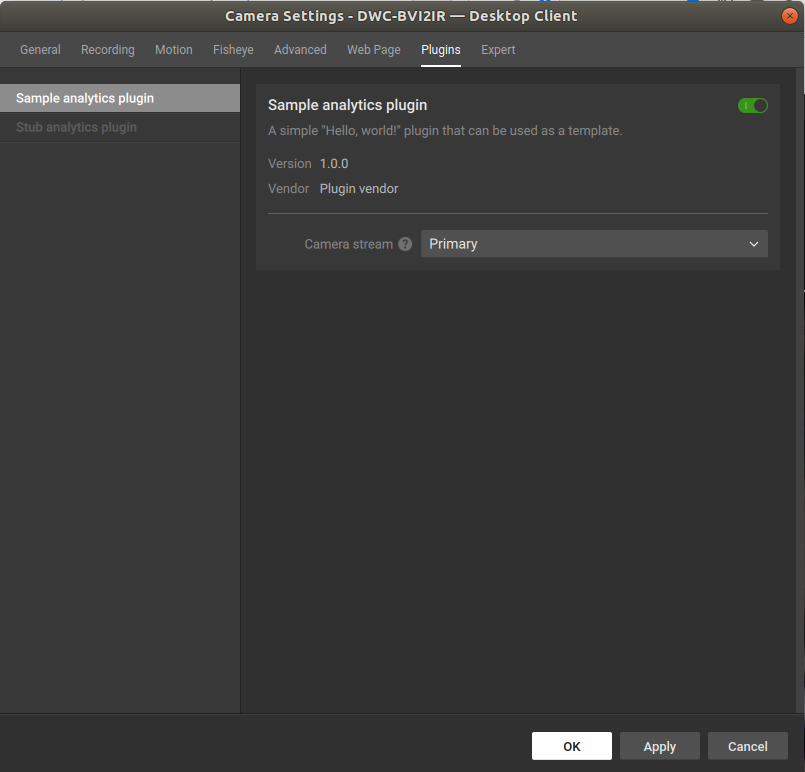
Find the
Sample analytics pluginand switch theEnableslider to the active position.Click
OKto apply the changes.
You have managed to load and enable the sample plugin!
Comments
0 comments
Article is closed for comments.